
Working exclusively on the “Resi”-side of the industry? No problem, as that’s where SI’s roots truly are.
For those on the residential side of our industry, they are often looking for software solutions with their own needs in mind. The D-Tools System Integrator platform is a perfect match for such professionals. After all, SI originally started primarily as a residential-only solution, born from the minds of those working on that side of the market.
While other software platforms were developed to serve multiple markets, SI was conceived to serve the audio-video industry and most specifically the residential market. Although SI has its roots in the residential side of the industry, it can effectively serve users across all market sectors. For this entry, however, we’ll focus on some of SI’s features that really benefit those working in the housing market.
So, what are some of these features that serve the resi-only market”?
For starters, nothing can replace the use of a floorplan to properly visualize your project bid. Along with Project Templates, Project Approval (both partial and full), and the resultant Change Orders, we’ll highlight how each of these features truly benefits residential contractors.
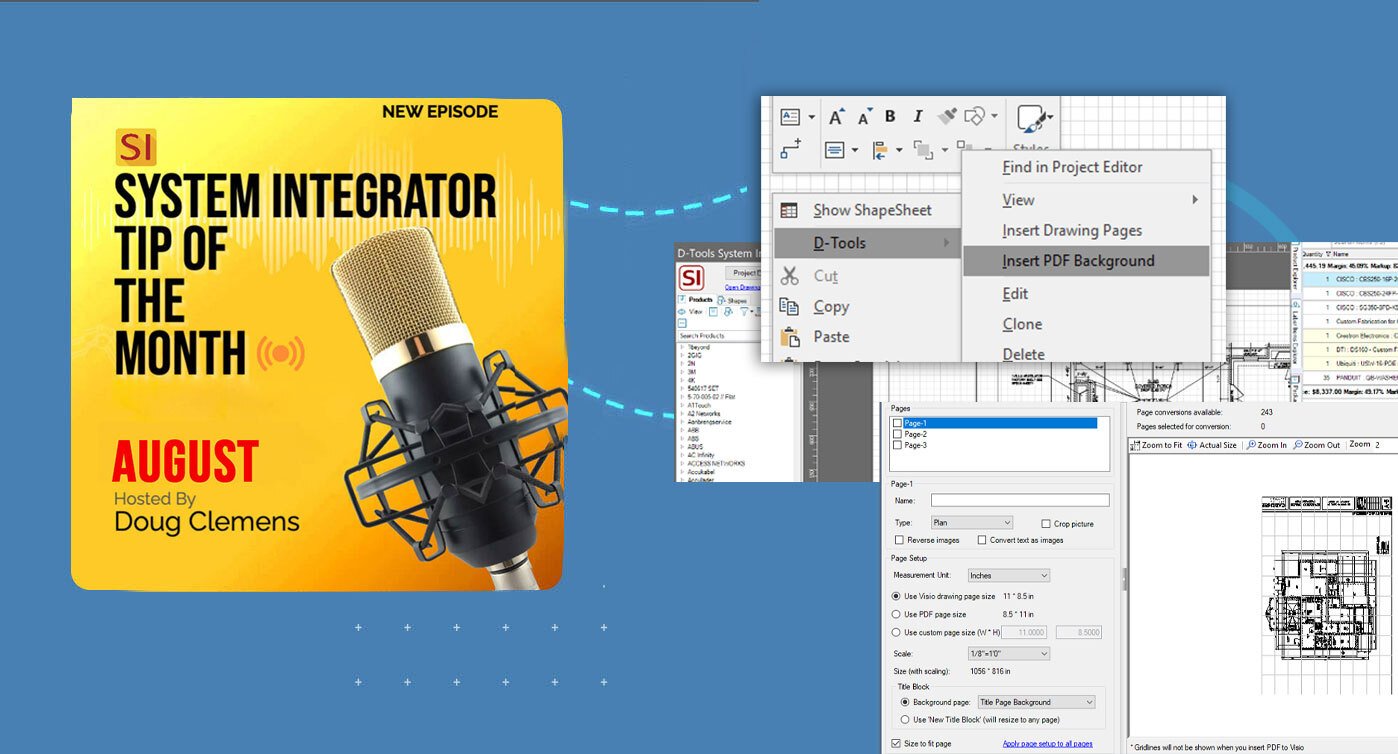
The use of Visio's floorplan background
While many features of SI are vital, the use of a floorplan to plot your bill of materials design is perhaps second to none.
Keep in mind, there are several configuration elements when using Visio in conjunction with SI. If you need assistance with this prior to getting started, please reach out to our team.
SI makes adding floorplans very easy in the Visio environment. It is accomplished through a process referred to as “Insert PDF Background”.

This is accessed by simply right-clicking in the design grid area of your “Plan” page in Visio. From there, you’ll see a helpful instructional window to guide you in getting the most out of your background insertion.

A key to keep in mind here is that, if scale matters for the items you want to plot against your background, you’ll need to know the size and scale of the PDF you’re inserting. This ensures that items such as speakers, sensors, touch panels, and other devices are properly scaled relative to the space where they are placed.
*(A note for users here: if you do not know the size or scale of your drawing, Visio provides the tools to help—so no need to worry over that.)
Once you’ve reviewed the instructional page, you’ll then see a file directory window, allowing you to select your background PDF. After selecting your file, the actual insertion screen will be displayed:

There are many elements to review here, and since this blog isn’t intended to be entirely about Visio, we recommend consulting our online documentation for further details—or, better yet, book time with our PSG industry-veteran team for assistance with this process. For now, suffice it to say that scale, size, and unit of measure are key factors to consider.
Once you insert your background, the PDF will load into the Visio design grid environment:

Things to consider here are the Visio tools “Rotate”, “Crop”, and “Layers.” Once your drawing is adjusted accordingly, only the floorplan space should remain visible in the design grid environment.

At this point, you can plot your items by either dragging them from the Catalog on the left side of the screen or from your Project if the items are already present.

As you add items to your design environment, you have the option to change sizes, colors, and fonts, as well as enabling or disabling text values. For more specific information on these details please see our online documentation or consult with our PSG team.
As you add items from the Catalog into the design grid, they will populate in the SI Project’s bill of materials.


As you add from the Project, those already present in the drawing will receive a “blue-dot” designation, distinguishing them from items not yet placed in the design environment.

Once completed, you’ll have a very dynamic visual presentation of your team’s bid—one that is not only ready for client submission but also helpful for your deployment team and other trade-partner contractors involved on the Project:

It is strongly recommended for teams not already using this interface to begin doing so immediately to improve their overall efficiency. While many SI users are engaged in this design activity, they may not be leveraging it to its full potential. To address either of these situations, please reach out to our Account team to schedule time with our PSG consultants. They will ensure that you get the most out of your use of SI and Visio.
The use of SI's Project Templates
While each project that residential contractors take on is unique, there are certain aspects that remain consistent across jobs.
Whether it’s rack components, the number of zones, product brands, or a combination of specific elements in a single space (such as a media room), many teams rely on similar designs from project to project. SI offers a great tool to reduce the burden of replicating redundancies: the Project Template.
Whether it is for an entire project or simply a zone count, the SI Project Template gives users the opportunity for a head start when approaching new bids.

The real beauty of this feature is that any project (or part of a project) can be saved as a template. That ideal 32-zone surveillance system you designed last month can be repurposed repeatedly simply by creating a template from that project. The icing on this cake is that all aspects of any prior project used to create a template can be included in the new template. Perhaps the cherry on top is that design drawing (Visio or AutoCAD) can also come along for the ride.
Let’s review how this works in SI.
First off, you’ll need a Project in SI. If you’re a new user, you may want to consider importing a prior project from another platform as a head start.
Once identified, you’ll need to right-click on the Project and select Create Template.

This will then open a screen where you can name the template accordingly:

As a bonus, you can include a description of the template (as seen above) to provide your team with more information about its details. The screen also gives you access to any files from the source Project that you may want to include in the new template.
Once you’ve picked the files to include, simply click Save in the bottom-right corner, and your template will be ready for use. You’ll then be able to select, view, and edit it from the top-left corner of the SI Project Explorer.

Just click on the View icon to select Templates. You will then see a screen listing all your available templates:

And just like that, you’re on your way to getting a head start on your next project build in SI.
Project Approvals
Another outstanding feature for residential contractors in SI is Project Approval. With the addition of the partial Project Approval mechanism in v23, users now have a timely tool to help ease the burden of projects that span several months or longer. 
Since the addition of Project Approval in SI, our users have enjoyed the ability to “lock” an SI Project at a specific point in its lifespan—preventing any further modifications to the bill of materials. When tied to SI’s Workflow Rules, this action can also alert other team members that an SI Project needs their attention. This is great considering that many residential estimators, project managers, and owner/operators spend much of their time in the field. As a result, they do not always stay connected with office-based team members. SI helps bridge that gap through the Project Approval mechanism.
Let’s review how this feature works. First, you’ll need to be in the Project Explorer to access it:

Just look for the Approval icon and select Mark Project As Approved. Keep in mind that you’ll need to check out the Project from your SI Server to access this feature.
Once this is done, a screen will appear with all the details you need to complete your Project Approval:

Status, close date, conversion to unit-based (recommended), and the setup of resultant Change Orders with their own payment terms are all available for you to configure.
On the Revision tab, you’ll see the details that will be included with your locked version of your Project:

Once these selections are made, simply click Mark as Approved to generate the approved project:

If partial Project Approval is your aim for long-term projects, simply follow the same steps as regular full Project Approval and select the new option in the resultant window:

At the bottom of that screen, you’ll see the option to Approve Project Partially. From there, select the items to be approved, and the remaining bill of materials will then be transferred to a Pending Change Order.

In this next window, you’ll notice that you have full access to all Layouts (including your custom ones), so filtering for the appropriate group for approval can easily be done by Location, System, Phase, and more—nice and convenient.
Once you’ve selected your approved items, a pending Change Order will appear in the lower tab directory of your Project Explorer list:

This is a real breakthrough for a majority of our users, and we hope it will be a great benefit for you as well.
Change Orders
With the advent of SI’s Project Approval mechanism, Change Orders have become a much more structured process. This is to our users’ benefit, as Change Orders can be created once the project is designated ready for them. Prior to that point, SI users still have Revisions available to modify a Project’s bill of materials for proposal alterations and client negotiations.
Once a Project is ready for Change Orders, your team can access this feature in one of two ways: either create a new Change Order in the sub-tab directory below your Project list or modify any aspect of your bill of materials in order to trigger the process.

If you chose the latter, you’ll see a series of messages directing your efforts accordingly:

From there, you will see your option to create a new Change Order.

Once you actually create a new Change Order, you’ll be able to name it, add notes, and specify whether it is internal or external:

A note on Internal versus External Change Orders: put simply, an Internal CO is something that does not require the client’s attention—for example, a bracket exchange due to availability or compatibility. External COs, on the other hand, are billable changes that require client approval for processing.
Once these determinations are made, you’ll see the Change Order environment of your SI Project:

For those following along or “playing the home version”, you’ll notice that this Project screen is almost identical to a standard, non-approved Project. That was intentional. However, there are two main changes you need to be aware of once your CO is live.
First, any item modified from the approved list of items in your Project will be displayed differently from the rest. Deleted items with be shown as “struck-through” and added items will be in green.

Hopefully, this makes it easier to identify these values on large-scale projects.
If not, another key difference in an SI Project CO compared to a standard Project is the presence of the Change Order Filter.
 This selection allows users to view the entire Project and all Change Orders, or to simply review each CO individually.
 Use the checkboxes on the left-hand side to determine what will be displayed in your Project window. And yes, that does include the prior approved Project list of items as well as any combination of the “pending” Change Orders.
A quick note on Pending versus Approved Change Orders: it’s fairly straightforward, but to clarify, pending means the Change Order is under consideration, while approved means the client (or authorized agent) has confirmed the Change Order. Once approved, all CO items are added to the list of prior-approved Project items.
We’ll close out the profile on Change Orders with some input on the Reporting side of the mechanism. SI’s default Client reports prompt users to select which bill of materials they want to display in the submission details.

When multiple COs are present, users must choose which one is relevant for their report details.
Once selected, the report header will show the Change Order designation:

All of the above CO details are critical for our specialized residential contractors, who routinely need repeatable mechanisms, structured steps for success, and the flexibility to quickly assemble specific components to meet client demands in this high-stakes market sector.
Well, there it is—a look at a few aspects of D-Tools SI v23 that really support our residential contractors. But of course, there’s more than just these, so please reach out to our Account team for more information on these features and more!
Looking Ahead: SI v23 and beyond
The last few years have seen tremendous updates and enhancements to the System Integrator platform. With each successive development and addition, D-Tool's has shown itself to be fully engaged in bringing to market one of the most effective software platforms available.
With that in mind, we encourage our users to consider SI a strategic partner for the AV integration industry that can help with navigating complex and hectic opportunities. By combining foundational aspects of the software such as Labor Types, Price Adjustments, Project Templates, and Project Cloning, v23 not only empowers businesses to operate with unprecedented efficiency but also offers the flexibility most teams need to craft a custom software environment to suit their needs.
Are you ready to experience SI v23? Then visit the D-Tools’ website to request a demonstration of these features or explore the full range of utilization with our PSG training and implementation team. With v23, as your ally, your business will be poised for a brighter and more profitable future.
Be sure to tune back in here for future installments on SI’s v23 and beyond.
Our team is continually evaluating ways to improve and enhance your team’s usage of and experience with our SI platform. Therefore, it behooves you and your team to explore these (and other features) as well by securing time with our Professional Services Group, comprised of SI and integration industry veterans, in order to maximize your team’s ability to succeed with the software.
In closing…
For more information on these and other features of SI, please see this link: D-Tools v23. You can also review our other videos and our standard support documentation.
You can also get more detailed information about v23 via our upcoming webinars and by enrolling in SI training with our PSG team.
And don’t forget— that’s why we are here— to ensure your success with our product! Be sure to check back here next time for more on v23!!!

